Contact Us

Filter Close

NEWS at Quanex

See the latest news, posts and events from Quanex about our business, the industry, our people and more.

2026 How to Measure a Screen Door Frame?

Measuring a screen door frame looks simple, but small errors can create large installation problems. A gap of only a few millimeters may cause rubbing, drafts, or insects entering around the edges. This 2026 guide explains how to measure accurately before ordering or replacing a screen door.

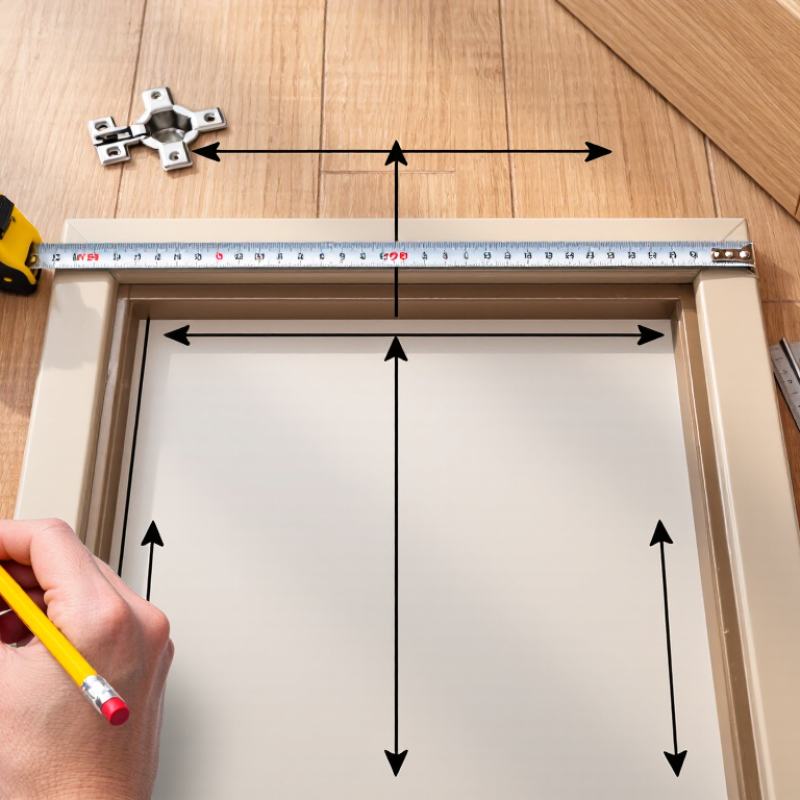
Begin with a reliable steel tape measure, a pencil, and a notepad. Measure the frame opening at the top, middle, and bottom. Record each width separately. Then measure the height on the left, center, and right sides. Do not assume the opening is perfectly square. Older homes often settle, and even newer frames may vary slightly.

Measure twice.

Use the smallest width and height when selecting a door, unless the manufacturer gives different instructions. Check whether you are measuring the rough opening, the finished frame, or the space available inside the hinges and track. These terms are not interchangeable. I have seen otherwise careful measurements fail because the trim was included accidentally. That mistake is easy to make.

This guide also covers frame depth, sill conditions, mounting surfaces, and clearance for handles or closers. A straightedge can reveal bowed jambs that a tape measure misses. Take clear photos before purchasing hardware. They may expose details you forgot to record. No method is perfect, especially when the existing frame is damaged or uneven. When measurements conflict, pause and inspect the opening rather than guessing. Accurate notes make the screen door frame easier to match, install, and adjust.
2026 How to Measure a Screen Door Frame?

Determine the Screen Door Frame Type and Measurement Points

How to Measure a Screen Door Frame in 2026

Before measuring, identify how the screen door operates. A hinged door swings from side hinges, while a sliding door runs along upper and lower tracks. A retractable screen usually needs measurements from the mounting surfaces, not the opening alone. The frame type changes every measurement point.

For a hinged frame, measure the inside width at the top, middle, and bottom. Record the smallest number. Measure height on the left, center, and right sides, from the sill or threshold to the top jamb. Again, use the shortest measurement. Check the jamb depth, hinge clearance, and handle space. A tape measure can bend easily. Keep it straight and level.

For a sliding frame, measure the track opening between the side channels. Check width at several heights because older frames may not be parallel. Measure the track depth and inspect the top guide. Look for worn rollers, raised screws, or a damaged threshold. These details can affect fit more than expected. I once measured only the center width and missed a six-millimeter difference at the bottom. That mistake was avoidable. Write every measurement in the same unit, and label each point clearly. Recheck unusual results before ordering or cutting anything.

2026 How to Measure a Screen Door Frame?

Common Nominal Screen Door Opening Widths

First determine the frame type: hinged doors are measured across the fixed opening and sliding doors are measured within the sliding track. For a reliable fit, measure the opening width at the top, middle, and bottom, then measure the height on both sides. Use the smallest recorded width and height when selecting the door size.

The chart compares common nominal opening widths: 30, 32, and 36 inches, equivalent to approximately 762, 813, and 914 millimeters. Always verify the actual manufacturer’s fitting range and measure the frame depth before ordering.

Gather the Tools Needed for Accurate Frame Measurements

2026 How to Measure a Screen Door Frame?

Gather the Tools Needed for Accurate Frame Measurements

Accurate measurements begin with simple, reliable tools: a steel tape measure, pencil, notepad, level, and flashlight. A narrow straightedge also helps reveal bent jambs. Use a 6-foot level when possible. Short levels can hide uneven framing.

The U.S. National Institute of Standards and Technology, in Technical Note 1297, stresses repeatability and measurement uncertainty. In practice, measure the opening width at the top, middle, and bottom. Record each result to the nearest 1/16 inch. Then measure the height on the left, center, and right. Do not assume the frame is square. Measure both diagonals. If they differ, the opening may need adjustment rather than a simple replacement screen.

Keep the tape straight and fully extended. Avoid measuring over trim, seals, or loose debris. A flashlight can expose compressed weatherstripping that changes the usable opening. The American Society for Testing and Materials also emphasizes controlled, repeatable procedures when evaluating construction measurements. That principle matters here. Measure twice.

I still make one mistake sometimes: I trust the first reading. That is risky. Temperature, tape angle, and hand pressure can alter small dimensions. Write down the smallest width and height, but check the manufacturer’s clearance requirements before ordering. A perfect tape reading cannot correct a warped frame.

Measure the Existing Doorway Width at Multiple Locations

How to Measure a Screen Door Frame?

Measure the Existing Doorway Width at Multiple Locations

Before measuring, remove loose trim, weather seals, and anything blocking the opening. Use a steel tape measure for a straighter reading. Measure the clear doorway width between the left and right jambs. Take measurements near the top, center, and bottom. Write each number down immediately.

The smallest measurement usually controls the required screen door width. For example, the top may measure 36 inches, while the center measures 35 7/8 inches. That difference matters. Measure in at least three locations, and check both sides for warping. An older frame may look square but narrow near the threshold.

I also measure the opening height on the left, middle, and right. A level can reveal a tilted jamb or uneven floor. Keep the tape level across the opening. Do not follow the angle of the frame. I once measured only at eye level and ordered a door that rubbed near the bottom. It was an avoidable mistake. Measure again after cleaning the sill, because dirt can hide the true clearance. Leave room for the manufacturer’s installation allowance, hinges, and latch hardware. Record the frame depth too, especially when the mounting surface is narrow or irregular. Old openings are rarely perfect.

Measure the Doorway Height from Sill to Top Frame

2026 How to Measure a Screen Door Frame?

To measure the doorway height, use a rigid steel tape and start at the sill. Measure from the surface where the screen door will rest to the underside of the top frame. Do not measure from the floor unless the door sits directly on it. Dirt, old sealant, or a raised threshold can change the usable height. Clean the sill before measuring.

Take three height measurements: at the left side, the center, and the right side. Keep the tape vertical, and check it with a small level if possible. Record each result carefully. The smallest measurement usually gives the safest reference because older openings are rarely perfect. I once measured only one side and missed a six-millimeter difference. That small error affected the fit.

Look closely at the top frame. Measure to its lowest solid point, not to a decorative edge or loose trim. If the sill slopes, follow the actual door path rather than guessing from the highest corner. Repeat the measurements after checking that the tape is not bending. Write the numbers in millimeters or inches, but never mix both systems. Leave the final adjustment to the installation instructions, since different frames require different clearances. A pencil mark helps. The sill may still be uneven.

2026 How to Measure a Screen Door Frame? - Measure the Doorway Height from Sill to Top Frame

Measurement Dimension Where to Measure Example Reading How to Record or Use the Result
Doorway height — left side Measure vertically from the top surface of the sill or threshold to the underside of the top frame. 80 1/8 in (2035 mm) Keep the tape straight and parallel with the side jamb. Record the smallest height from all three height readings.
Doorway height — center Measure at the center of the opening from the sill surface to the top frame. 80 1/4 in (2038 mm) A height difference between locations can indicate a sloping sill, bowed frame, or uneven head jamb.
Doorway height — right side Measure vertically at the opposite jamb, again from the sill surface to the underside of the top frame. 80 3/16 in (2037 mm) Use the lowest of the left, center, and right measurements when checking available door height.
Minimum clear height Compare all three height readings. 80 1/8 in (2035 mm) This is the controlling height for fitting. Do not use the average height for the final fit.
Opening width — top Measure horizontally between the inside faces of the side frames near the top. 35 7/8 in (911 mm) Measure to the nearest 1/16 in or 1 mm if possible.
Opening width — center Measure across the middle of the doorway between the jambs. 36 in (914 mm) A narrower center or end reading may indicate a bowed jamb or an out-of-square opening.
Opening width — bottom Measure horizontally above the sill or threshold, between the inside faces of the side frames. 35 15/16 in (913 mm) Use the smallest width when determining the available opening size.
Minimum clear width Compare the top, center, and bottom width readings. 35 7/8 in (911 mm) Use this smallest measurement when checking the screen door frame size.
Frame depth Measure the flat mounting surface from the front edge of the frame to the inner edge or obstruction. 1 1/4 in (32 mm) Check that the available surface is wide and flat enough for the selected mounting hardware.
Opening diagonals Measure from the upper-left inside corner to the lower-right, then from the upper-right to the lower-left. 87 3/4 in and 87 7/8 in (2229 mm and 2232 mm) The 1/8 in (3 mm) difference suggests a slightly out-of-square opening; verify the door instructions before ordering.
Sill or threshold condition Inspect the surface where the screen door will sit or swing over. Flat, dry, and level; no raised obstruction Remove temporary objects and account for any permanent lip, trim, weather seal, or uneven surface.
Hardware and swing clearance Check the space around hinges, handles, locks, door trim, and the opening path. No interference within the planned swing path Measure or note every obstruction before selecting the handing and installation position.
Measurement rule: Take each height and width measurement at least twice. Record the smallest clear height and smallest clear width, and compare them with the installation requirements for the specific screen door frame.

Record the Measurements and Select the Correct Screen Door Frame

2026 How to Measure a Screen Door Frame?

Accurate measurements help you select a screen door frame that fits securely. Use a steel tape measure, not a flexible ruler.

Measure the opening width at the top, middle, and bottom. Record every number immediately. Then measure the height on the left, center, and right.

Wall openings are often uneven, especially in older homes. Do not assume one measurement represents the entire space.

Check the frame depth and inspect the mounting surface for trim, screws, or raised edges. Measure from the inside edge to the outside edge where the new frame will sit.

Use the smallest width and height measurements when selecting a replacement frame. This allows room for adjustment.

Also confirm the door’s swing direction and handle position. A frame can fit the opening but still operate poorly.

I once ignored a slight floor slope, and the door dragged during humid weather. That mistake was avoidable.

Tips:

Keep a clear record with the date and location. Measure twice. Write measurements in inches or millimeters, but never mix units.

Check whether the frame requires an additional clearance gap. Compare your recorded dimensions with the manufacturer’s fitting range before ordering.

If the opening differs by more than a few millimeters, pause and inspect the structure. Small inconsistencies may indicate loose trim or an uneven threshold.

When unsure, consult a qualified installer for a second measurement.

Scroll to Top