


NEWS at Quanex
See the latest news, posts and events from Quanex about our business, the industry, our people and more.
10 Exterior Door Casing Tips for Buyers
Exterior door casing may look like a finishing detail, but it shapes the entrance’s first impression and helps cover the joint between the door frame and wall. Buyers should look beyond crisp paint and even miters. Check for soft wood, open seams, uneven reveals, and gaps where water could collect. Small clues matter.
The 2024 Journal of Light Construction Cost vs. Value report estimated that a steel entry-door replacement cost $2,355 nationally and returned $4,430 in resale value. That figure covers the door project, not casing alone, so it should not be treated as a casing-specific return. Still, it shows why entry upgrades attract buyer attention. Building scientist Joseph Lstiburek writes, “The perfect wall is one that has the control layers on the exterior of the structure,” in Building Science Corporation’s “The Perfect Wall.” His point is relevant: attractive trim cannot replace sound water management. Look closely at the head casing, side joints, caulk, and paint edges. Is flashing properly integrated? Is the trim material suitable for local exposure? A neat reveal can still hide a weak detail. That is easy to miss during a quick viewing. These ten tips help buyers assess exterior door casing with practical questions, not just curb-appeal impressions. They also encourage a careful pause: some defects are cosmetic, while others may signal moisture trouble.
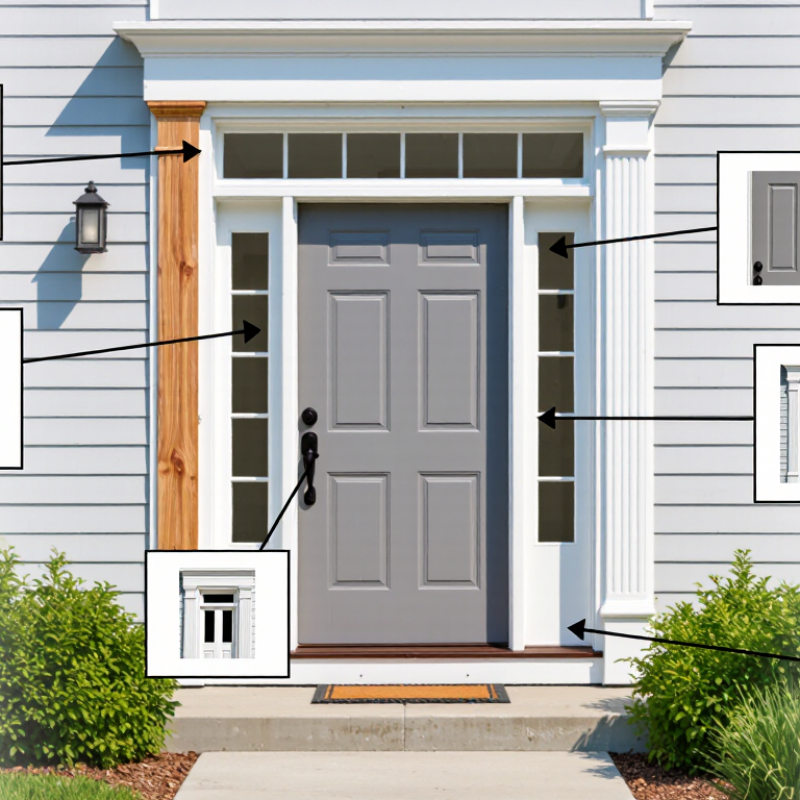
Understanding the Purpose and Parts of Exterior Door Casing
Exterior door casing is the trim around the frame, not the frame itself. The head casing spans the top, while two side casings cover the edges of the rough opening. Together, they hide installation gaps and create a neat transition to siding or masonry. The jamb holds the door; the sill and threshold sit below it. Casing can help shield exposed edges, but it is not the home’s primary water barrier. Flashing, drainage, and sound installation matter more.
The U.S. Department of Energy’s Energy Saver guidance estimates that air leakage accounts for 25–40% of heating and cooling energy use in a typical home. That estimate applies to the whole home, not door casing alone. Still, casing condition can offer useful clues. Check for split joints, soft or swollen wood, gaps, and loose trim. A slightly uneven joint may be cosmetic, or it may signal movement; ask for an inspection before guessing.
Tip: Look along the top edge for a drip cap, and check that casing joints are tight. Press gently near the lower corners; soft material deserves attention. Ask what flashing and sealant sit behind the trim, since neat caulk cannot fix every hidden gap. Small details matter.
10 Exterior Door Casing Tips for Buyers: Understanding the Purpose and Parts of Exterior Door Casing
| # | Tip | What to Know | Buyer Check |
|---|---|---|---|
| 1 | Understand the casing’s purpose | Exterior door casing, also called exterior trim, frames the opening and covers the joint between the door jamb and the surrounding wall finish. It can also help protect exposed edges, but it is not a substitute for proper flashing or water management. | Look for trim that sits securely and meets the wall evenly, without open gaps or visible separation. |
| 2 | Identify the main casing parts | A common arrangement has one horizontal head casing above the door and two vertical side casings, sometimes called legs. The sill or threshold is a separate door component, not a casing piece. | Check that the head and side pieces meet neatly at their corners and are firmly attached. |
| 3 | Check the fit around the jamb | Casing should cover the transition between the jamb and the wall while remaining compatible with the door and wall assembly. Uneven gaps may indicate poor installation or movement. | Inspect both sides and the top; note gaps, loose sections, or trim that projects inconsistently. |
| 4 | Look for signs of water intrusion | Soft or swollen wood, peeling paint, staining, and recurring caulk failure can be signs of moisture exposure. These clues do not identify the cause on their own. | Pay particular attention to the lower ends of the side casing, the head, and nearby interior surfaces. |
| 5 | Ask how the opening is flashed | Flashing helps direct water away from the door opening and should be integrated with the surrounding water-resistive barrier and wall finish. Casing and surface sealant alone should not be relied on as the complete water-control system. | Ask whether the installation includes appropriate flashing, especially above the head casing. |
| 6 | Consider the casing material | Exterior trim is commonly made from painted wood, cellular PVC, or other exterior-rated materials. Materials differ in maintenance needs, appearance, fastening requirements, and compatibility with the surrounding construction. | Confirm that the material is intended for exterior use and suited to the local exposure and finish plan. |
| 7 | Inspect paint and exposed edges | Paint or another suitable finish helps protect materials that require a protective coating. Cut ends and joints may need specific treatment according to the trim material and installation instructions. | Look for peeling, bare areas, open joints, or exposed material that appears unprotected. |
| 8 | Check the sealant carefully | Sealant can close selected joints, but it needs to be compatible with the adjoining materials and should not block intended drainage paths. Sealant is not a replacement for correctly installed flashing. | Look for cracked, missing, or heavily deteriorated sealant, and ask how water is intended to drain. |
| 9 | Compare profiles and proportions | Flat, molded, and decorative profiles are common choices. The casing should provide adequate coverage at the jamb-to-wall joint and suit the scale and style of the opening. | Check that the profile is consistent on both sides and that the trim does not interfere with the door or hardware. |
| 10 | Include the casing in the inspection | Trim condition can provide useful clues about installation quality and moisture exposure, but a visual check cannot confirm the condition of concealed framing or flashing. | If you see persistent moisture signs, soft material, or extensive separation, consider evaluation by a qualified building professional. |
Related Posts
-

Why Is Exterior Door Casing Important?
-

Exploring Industry Trends for Exterior Door Casing at the 2025 China Import and Export Fair
-

How to Choose the Best Patio Door Seal for Your Home?
-

10 Best Commercial Windows and Doors for Global Buyers
-

7 Essential Tips for Choosing the Perfect Patio Glass Doors for Your Home
-

Best Sliding Glass Door Systems for Global Buyers in 2026?